
Saturday, April 7, 2012

Monday, November 14, 2011
Telerik Multiple RadGrid
Here below code is telerik multiple radgrid. You can't copy paste this code but need to change the code as your requirment.
<telerik:RadGrid ID="gridRoles" runat="server" Skin="WebBlue" AutoGenerateColumns="False"
PageSize="5" AllowSorting="True" AllowPaging="True" GridLines="None" AllowAutomaticDeletes="True"
AllowAutomaticInserts="True" AllowAutomaticUpdates="True" OnDetailTableDataBind="gridRoles_DetailTableDataBind"
OnPageIndexChanged="gridRoles_PageIndexChanged"
OnItemCommand="gridRoles_ItemCommand" onitemdatabound="gridRoles_ItemDataBound">
<HeaderContextMenu EnableImageSprites="True">
</HeaderContextMenu>
<PagerStyle Mode="NumericPages"></PagerStyle>
<MasterTableView Width="100%" HierarchyDefaultExpanded="false" DataKeyNames="Roleid">
<DetailTables>
<telerik:GridTableView Width="40%" runat="server" Name="Modules" HorizontalAlign="Center">
<ParentTableRelation>
<telerik:GridRelationFields DetailKeyField="Roleid" MasterKeyField="Roleid" />
</ParentTableRelation>
<CommandItemSettings ExportToPdfText="Export to Pdf"></CommandItemSettings>
<Columns>
<telerik:GridBoundColumn DataField="Roleid" UniqueName="Roleid" Visible="false">
</telerik:GridBoundColumn>
<telerik:GridBoundColumn SortExpression="ModuleName" HeaderText="Module Names" DataField="ModuleName"
UniqueName="ModuleName">
</telerik:GridBoundColumn>
</Columns>
</telerik:GridTableView>
</DetailTables>
<CommandItemSettings ExportToPdfText="Export to Pdf"></CommandItemSettings>
<ExpandCollapseColumn Visible="True">
</ExpandCollapseColumn>
<Columns>
<telerik:GridButtonColumn ButtonType="ImageButton" CommandName="Edit" UniqueName="EditCommandColumn">
<ItemStyle HorizontalAlign="Center" />
</telerik:GridButtonColumn>
<telerik:GridBoundColumn DataField="Roleid" UniqueName="Roleid" Visible="false">
</telerik:GridBoundColumn>
<telerik:GridBoundColumn SortExpression="Rolename" HeaderText="Role name" DataField="Rolename"
UniqueName="Rolename">
</telerik:GridBoundColumn>
<telerik:GridBoundColumn SortExpression="Status" HeaderText="Status" DataField="Status"
UniqueName="Status">
</telerik:GridBoundColumn>
<telerik:GridButtonColumn ConfirmText="Delete this Role?" ConfirmTitle="Delete" ButtonType="ImageButton"
CommandName="Delete" UniqueName="DeleteColumn" ConfirmDialogType="RadWindow"
ConfirmDialogHeight="100" ConfirmDialogWidth="300">
<ItemStyle HorizontalAlign="Center" />
</telerik:GridButtonColumn>
</Columns>
<SortExpressions>
<telerik:GridSortExpression FieldName="Rolename" />
</SortExpressions>
<EditFormSettings>
<EditColumn UniqueName="EditCommandColumn1">
</EditColumn>
</EditFormSettings>
</MasterTableView>
</telerik:RadGrid>
<telerik:RadGrid ID="gridRoles" runat="server" Skin="WebBlue" AutoGenerateColumns="False"
PageSize="5" AllowSorting="True" AllowPaging="True" GridLines="None" AllowAutomaticDeletes="True"
AllowAutomaticInserts="True" AllowAutomaticUpdates="True" OnDetailTableDataBind="gridRoles_DetailTableDataBind"
OnPageIndexChanged="gridRoles_PageIndexChanged"
OnItemCommand="gridRoles_ItemCommand" onitemdatabound="gridRoles_ItemDataBound">
<HeaderContextMenu EnableImageSprites="True">
</HeaderContextMenu>
<PagerStyle Mode="NumericPages"></PagerStyle>
<MasterTableView Width="100%" HierarchyDefaultExpanded="false" DataKeyNames="Roleid">
<DetailTables>
<telerik:GridTableView Width="40%" runat="server" Name="Modules" HorizontalAlign="Center">
<ParentTableRelation>
<telerik:GridRelationFields DetailKeyField="Roleid" MasterKeyField="Roleid" />
</ParentTableRelation>
<CommandItemSettings ExportToPdfText="Export to Pdf"></CommandItemSettings>
<Columns>
<telerik:GridBoundColumn DataField="Roleid" UniqueName="Roleid" Visible="false">
</telerik:GridBoundColumn>
<telerik:GridBoundColumn SortExpression="ModuleName" HeaderText="Module Names" DataField="ModuleName"
UniqueName="ModuleName">
</telerik:GridBoundColumn>
</Columns>
</telerik:GridTableView>
</DetailTables>
<CommandItemSettings ExportToPdfText="Export to Pdf"></CommandItemSettings>
<ExpandCollapseColumn Visible="True">
</ExpandCollapseColumn>
<Columns>
<telerik:GridButtonColumn ButtonType="ImageButton" CommandName="Edit" UniqueName="EditCommandColumn">
<ItemStyle HorizontalAlign="Center" />
</telerik:GridButtonColumn>
<telerik:GridBoundColumn DataField="Roleid" UniqueName="Roleid" Visible="false">
</telerik:GridBoundColumn>
<telerik:GridBoundColumn SortExpression="Rolename" HeaderText="Role name" DataField="Rolename"
UniqueName="Rolename">
</telerik:GridBoundColumn>
<telerik:GridBoundColumn SortExpression="Status" HeaderText="Status" DataField="Status"
UniqueName="Status">
</telerik:GridBoundColumn>
<telerik:GridButtonColumn ConfirmText="Delete this Role?" ConfirmTitle="Delete" ButtonType="ImageButton"
CommandName="Delete" UniqueName="DeleteColumn" ConfirmDialogType="RadWindow"
ConfirmDialogHeight="100" ConfirmDialogWidth="300">
<ItemStyle HorizontalAlign="Center" />
</telerik:GridButtonColumn>
</Columns>
<SortExpressions>
<telerik:GridSortExpression FieldName="Rolename" />
</SortExpressions>
<EditFormSettings>
<EditColumn UniqueName="EditCommandColumn1">
</EditColumn>
</EditFormSettings>
</MasterTableView>
</telerik:RadGrid>
Query for add two nvarchar time columns
Query this in sql query editor:
select from,convert(nvarchar(10),(convert(datetime,Colname1)+convert(datetime,Colname2)),108) as to from table
Result will be:

select from,convert(nvarchar(10),(convert(datetime,Colname1)+convert(datetime,Colname2)),108) as to from table
Result will be:
Encrypt Appsettings in web.Config
Add these below two lines in pageload event:
ProtectSection("appSettings","DataProtectionConfigurationProvider");
UnProtectSection("appSettings");
Add these methods
private void ProtectSection(string p, string p_2)
{
Configuration config = WebConfigurationManager.OpenWebConfiguration(Request.ApplicationPath);
ConfigurationSection section = config.GetSection(p);
if (section != null && !section.SectionInformation.IsProtected)
{
section.SectionInformation.ProtectSection(p_2);
config.Save();
}
}
private void UnProtectSection(string sectionName)
{
Configuration config =
WebConfigurationManager.
OpenWebConfiguration(Request.ApplicationPath);
ConfigurationSection section =
config.GetSection(sectionName);
if (section != null &&
section.SectionInformation.IsProtected)
{
section.SectionInformation.UnprotectSection();
config.Save();
}
}
After executing this just go to web.config file and check the app settings tag.
Monday, July 4, 2011
.NET and C# interview questions:Show how do we view an assembly in .NET?
When coming to understand the internals, nothing can beat ILDASM. ILDASM converts the whole ‘exe’ or ‘dll’ in to IL code. To run ILDASM you have to go to ‘C:\Program Files\Microsoft Visual Studio .NET 2003\SDK\v1.1\Bin’. Note that we had v1.1 you have to probably change it depending on the type of framework version you have.
If you run IDASM.EXE from the path you will be popped with the IDASM exe
program as shown in figure. Click on file and browse to the respective
directory for the DLL whose assembly you want to view. After you select the
DLL you will be popped with a tree view details of the DLL as shown in
figure ILDASM. On double clicking on manifest, you will be able to view
details of assembly, internal IL code etc as shown in the figure.
program as shown in figure. Click on file and browse to the respective
directory for the DLL whose assembly you want to view. After you select the
DLL you will be popped with a tree view details of the DLL as shown in
figure ILDASM. On double clicking on manifest, you will be able to view
details of assembly, internal IL code etc as shown in the figure.
Note: - The version number are in the manifest itself which is defined with
the DLL or EXE thus making deployment much easier as compared to COM where
the information was stored in registry. Note the version information in Figure
Manifest view.
You can expand the tree for detail information regarding the DLL like methods, properties, functions etc.


Following is the video which shows that how the questions are asked C#
and .NET interviews.
C# and .NET interview questions: Explain in brief an interface?
Interface is a contract that defines the signature of the functionality. So if a class is implementing a interface it says to the outer world, that it provides specific behavior. Example if a class is implementing ‘Idisposable’ interface that means it has a functionality to release unmanaged resources. Now external objects using this class know that it has contract by which it can dispose unused unmanaged objects.
- Single Class can implement multiple interfaces.
- If a class implements a interface then it has to provide
implementation to all its methods.
Following code shows that one has the interface definition and other
class implements the interface. Below is the source code “IInterface” is the
interface and “ClsDosomething” implements the “IInterface”. This sample just
displays a simple message box.
class implements the interface. Below is the source code “IInterface” is the
interface and “ClsDosomething” implements the “IInterface”. This sample just
displays a simple message box.
Public Interface IInterFace
Sub Do Something ()
End Interface

Public Class ClsDoSomething
Implements IInterFace
Public Sub DoSomething () Implements WindowsInterFace.IInterFace.DoSomething
MsgBox (“Interface implemented”)
End Sub
End Class
After implementing the above code you will get the following output as shown:

Following you can see a simple video on boxing and unboxing:
.NET and ASP.NET interview questions: Define MVC, MVP and MVVM pattern?
MVC, MVP and MVVM are design patterns which come under the presentation pattern category and they help to remove any kind of cluttered code in UI like manipulation of user interfaces and maintaining state. Thus keeping your UI code cleaner and better to maintain.
MVC(Model view controller) pattern divides the architecture into 3 parts model, view and controller. The first request comes to the controller and the controller then decides which view to be displayed and ties up the model with the view accordingly.
MVP (Model view presenter) has the same goals as MVC i.e. separating the UI from the model. It does the same by using a presenter class. The UI talks via an interface to the presenter class and the presenter class talks with the model.MVVM is an architectural pattern with the focus of removing UI cluttered code. It does the same by using an extra class called as view model. MVVM is mostly suitable for Silverlight and WPF projects because of the rich bindings provided by the technologies.
Wednesday, June 29, 2011
WCF interview questions - What are 3 ways of implementing WCF(Windows Communication Foundation) concurrency?

Figure:
Single: - A single request has access to the WCF service object at a given moment of time. So only one request will be processed at any given moment of time. The other requests have to wait until the request processed by the WCF service is not completed.Multiple: - In this scenario multiple requests can be handled by the WCF service object at any given moment of time. In other words request are processed at the same time by spawning multiple threads on the WCFserver object. So you have great a throughput here but you need to ensure concurrency issues related to WCF server objects.
Reentrant: - A single request thread has access to the WCF service object, but the thread can exit the WCF service to call another WCF service or can also call WCF client through callback and reenter without deadlock.
You can also view video on WCF one way contract as follows: -
SilverLight interview questions - Three ways applying layouts in SilverLight?
There are three ways provided by Silverlight for layout management is Canvas, Grid and Stack panel. Each of these methodologies fit into different situations as per layout needs.
Canvas – Absolute Positioning
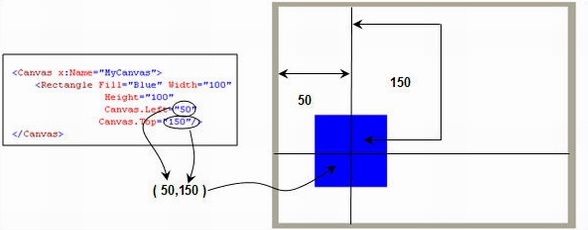
Canvas is the simplest methodology for layout management. It supports absolute positioning using ‘X’ and ‘Y’ coordinates. ‘Canvas.Left’ helps to specify the X co-ordinate while ‘Canvas.Top’ helps to provide the ‘Y’ coordinates.Below is a simple code snippet which shows how a rectangle object is positioned using ‘Canvas’ on co-ordinates (50,150).
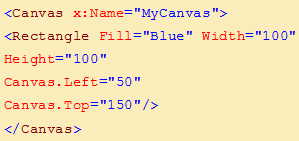
Below is how the display looks like. When you the run the code, the XAML viewer will position the rectangle object on absolute ‘X” and ‘Y’ coordinates.
Grid – Table layout
Grid layout helps you position your controls using rows and columns. It’s very similar to table defined in HTML.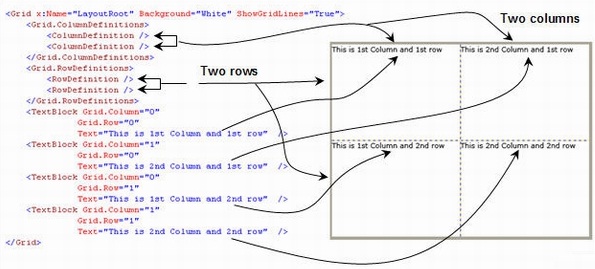
Above is a simple table with two columns and two rows defined using Grid. We have shown how the table display looks like. Using the Grid.ColumnDefinition, we have defined two columns and using Grid.RowDefinition, we have defined two rows. We have then created 4 text blocks which are then specified in each section using Grid.Column and Grid.Row. For instance, to place in the first column, we need specify the Grid.Column as 0 and Grid.Row as 0. We have followed the same pattern for everyone and you can see that all the textblocks are placed in the
appropriate sections.
appropriate sections.
Stack – One Above the Other
As the name says, so the behavior. Stack allows you to arrange your UI elements vertically or horizontally.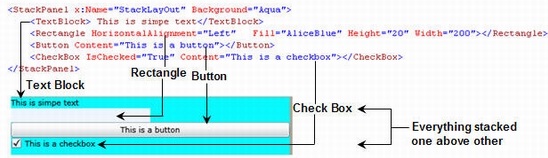
For instance, above are 4 elements which are arranged in a stack panel element. You can see how the stack aligns / stacks the elements one above other. You can also stack the UI elements horizontally or vertically depending on the nature of your layout.
Following is the video which demonstrates simple animation in SilverLight:Sunday, June 19, 2011
Wednesday, June 8, 2011
Thursday, June 2, 2011
Can you describe Sql Server Views are updatable?
View is a virtual table, which can contains data (rows with columns) from one or more table and you can retrieve data from a view.
Let’s demonstrate a simple example in which we will see that how to create a view on single table and will also see that if we update the view the respective table on which the view is created is updated or not.
Now let first see how to create view.
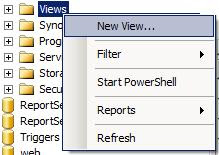
Go to View folder in SQL Server > Right click on it > select New View.
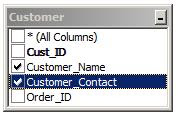
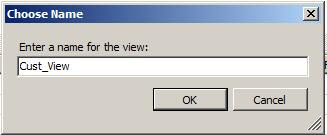
After selecting the column name just save the view and give View a nice name.
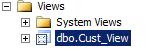
Once you have completed the above step you will see that the respective View is added in the View folder.
Now let’s see that when we update the view the respective table is also updated or not.
Query:-
Now let’s create a view based on two tables and try to update a view.
Let’s try to Update View:
Query:-
As you can see in the above query, I am trying to update a column from the Product table and another column from the Order table and try to execute the query the compiler will throw the below error.
Error Message:- View or function 'Practice.dbo.View_Cust' is not updatable because the modification affects multiple base tables.
This means that when you try to update both the table’s column from the view then it is not allowed but you can update single table column.
Please click here to see more .NET and SQL Server interview questions
Let’s demonstrate a simple example in which we will see that how to create a view on single table and will also see that if we update the view the respective table on which the view is created is updated or not.
Now let first see how to create view.
Go to View folder in SQL Server > Right click on it > select New View.

As soon as you click on New View, the following window will appear like below.

Now, just select the table name from the list on which you wish to create a View and Click on Add then click on close. Once you click on close a new window will appear which allow you to create View on the respective column.

After selecting the column name just save the view and give View a nice name.

Once you have completed the above step you will see that the respective View is added in the View folder.

Now let’s see that when we update the view the respective table is also updated or not.
Query:-
Update [Practice].[dbo].[Cust_View] set Customer_Contact = 96641122 where
Customer_Name = 'Feroz'
Now just go to the table on which the view was created and check whether the table is updated or not, you will see that the table is also updated when you update the View.Now let’s create a view based on two tables and try to update a view.
create view View_Cust as SELECT    dbo.Customer.Customer_Name, dbo.Customer.
Customer_Contact,dbo.[Order].Product_Name,dbo.[Order].Price
FROM dbo.Customer
INNER JOIN dbo.[Order] ON dbo.Customer.Order_ID = dbo.[Order].Order_ID
Let’s try to Update View:
Query:-
Update [Practice].[dbo].[View_Cust] set Customer_Contact = 098767554,
Price = 4000 where Customer_Name = 'Feroz'
As you can see in the above query, I am trying to update a column from the Product table and another column from the Order table and try to execute the query the compiler will throw the below error.
Error Message:- View or function 'Practice.dbo.View_Cust' is not updatable because the modification affects multiple base tables.
This means that when you try to update both the table’s column from the view then it is not allowed but you can update single table column.
Please click here to see more .NET and SQL Server interview questions
Subscribe to:
Posts (Atom)